![]() Call us now:
Call us now:


Event Ends In
Navigation: Event Guidelines > Support Setup > Infograph > Walkthrough > Event Drops
Event Guidelines
GUDAGUDA 4 – Final Honnoji Event consists primarily of Territory Control, Supply Production, and Recruitment.
Your goal for this event is play through the event by capturing territories around the event map. 4* Lancer – Nagao Kagetora is a fantastic Single Target Arts Lancer and one of the few in the game. This will be your final chance to get her.
Guidelines to follow
NOTE: This will be your last opportunity to obtain Kagetora in this event. Make sure not to miss it or else you will have to wait for a very long time for Aniplex to bring her back.
Support Setup Recommendation
Players will mostly focus on using NPC Supports for many of the territory control quests. This support formation will be used to help gather event currency. Craft Essences in the first row are optimized for the best nodes. The second row are for earlier but less efficient nodes. Servant Bonuses are only the basic Bond and Damage Bonus, only the Craft Essences will increase your currency drops.

Final Honnoji Infograph
By Kevinrealk
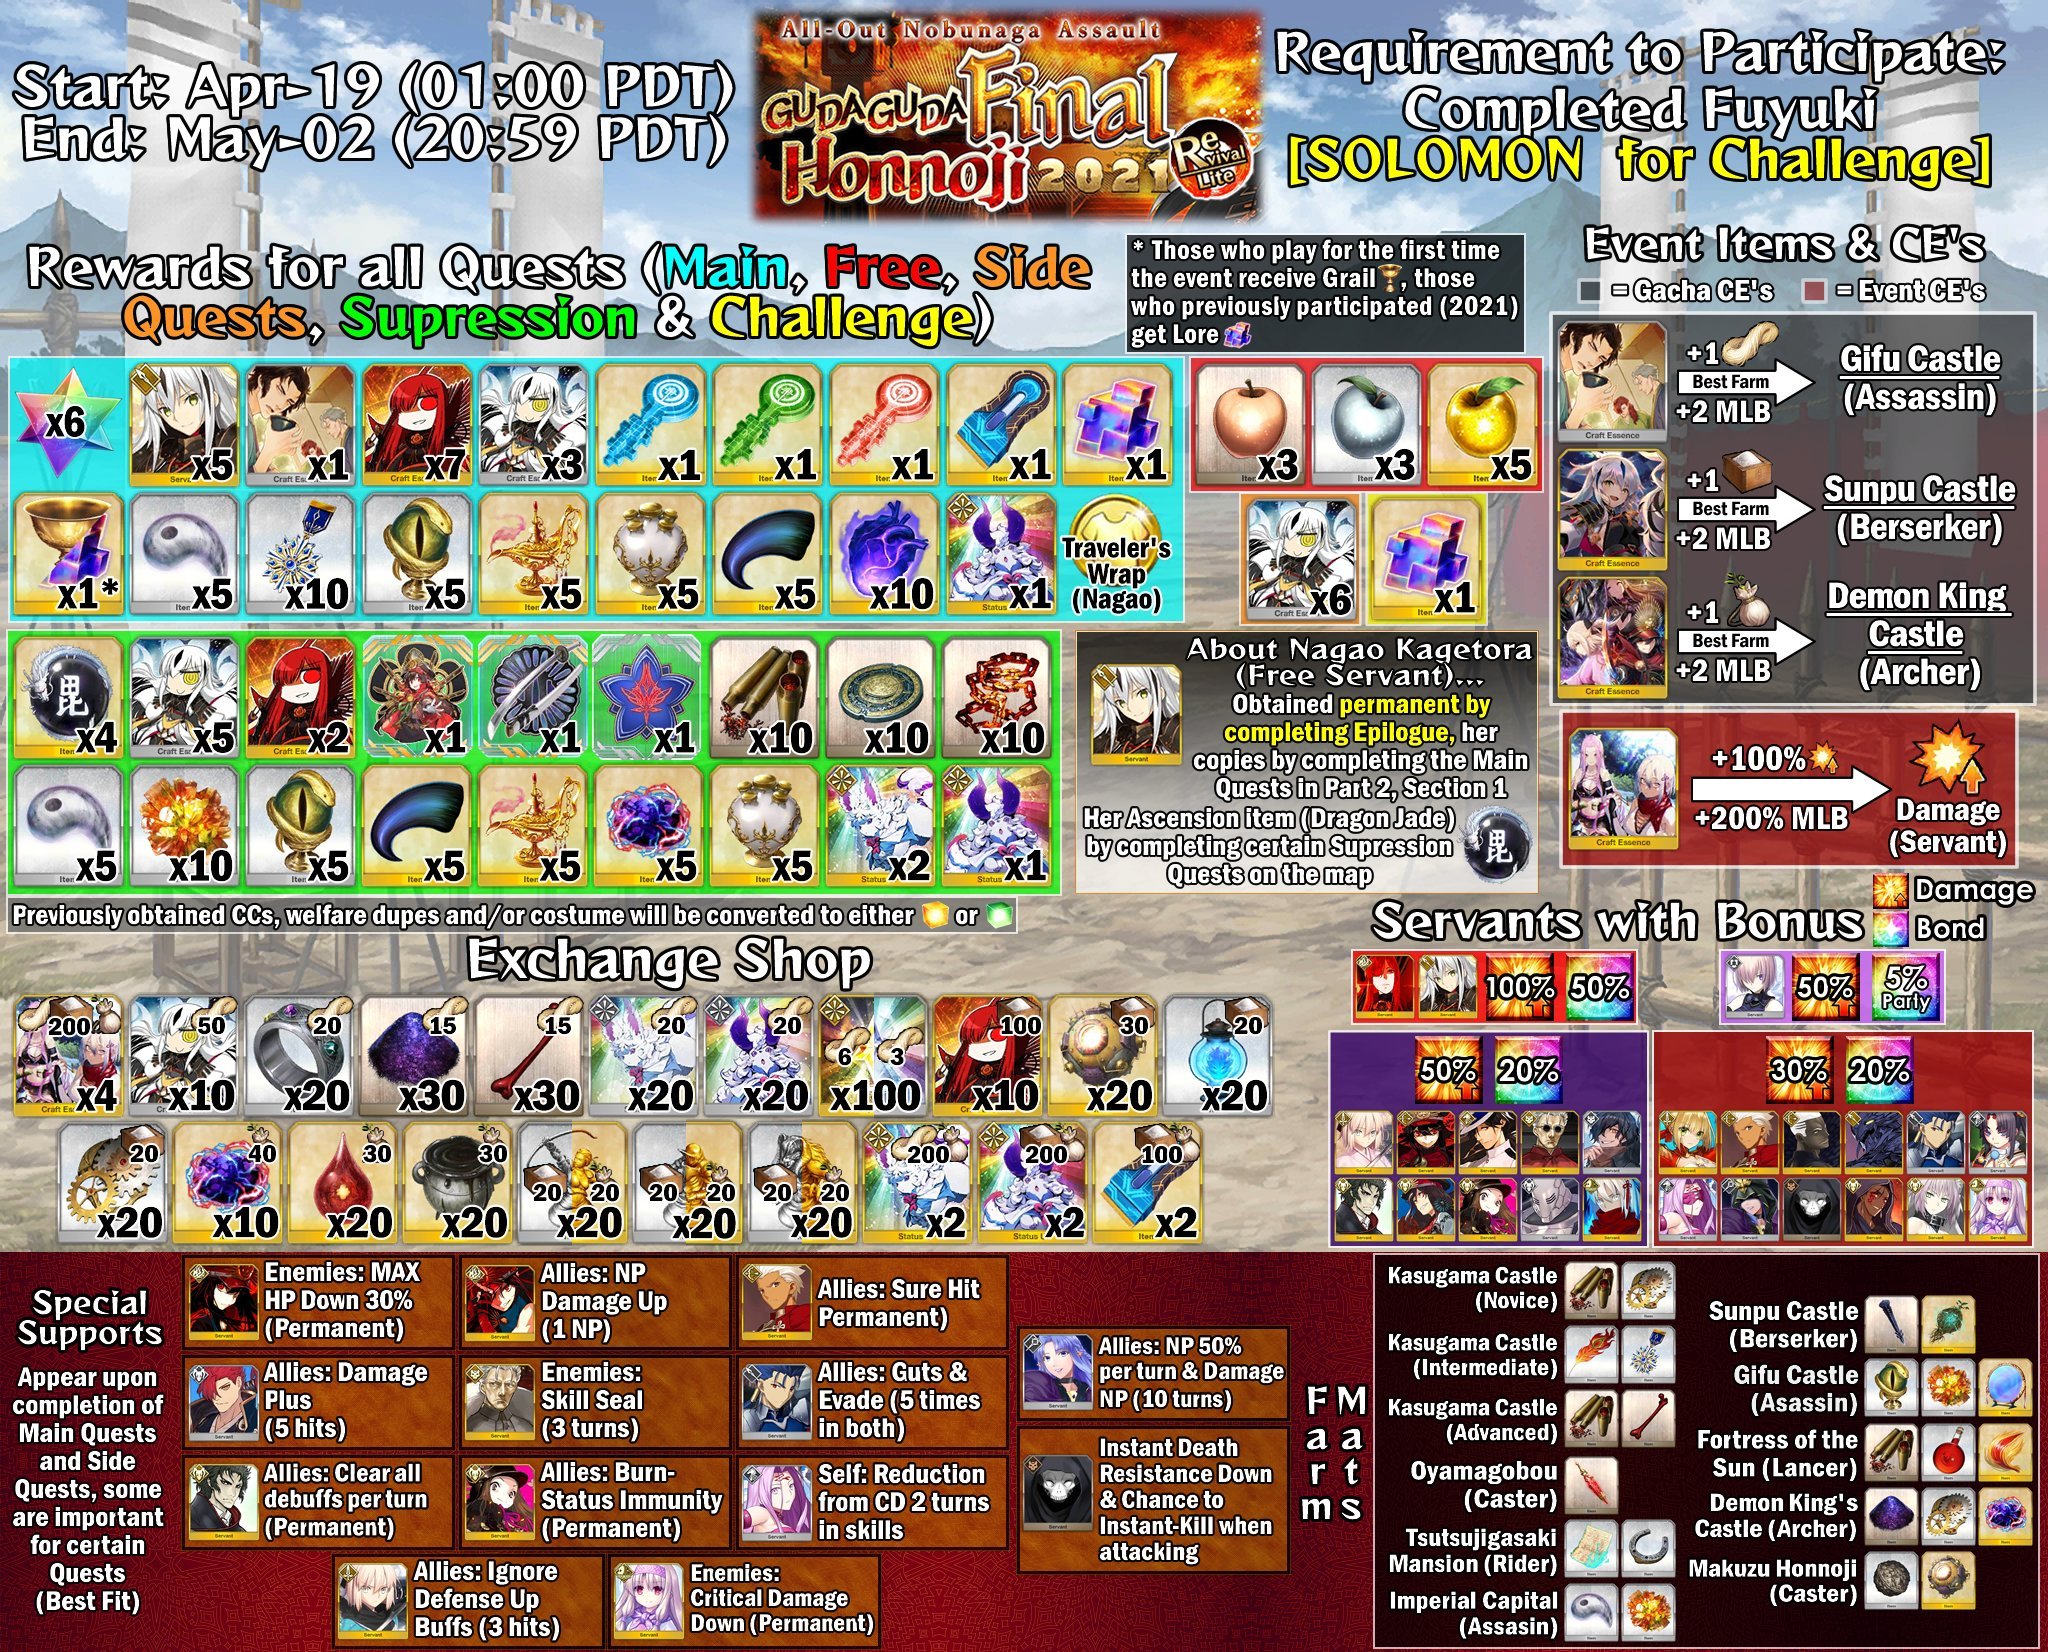
Click image for full size.
Event Walkthrough
Getting Started
Click each part below for detailed walkthrough
- Clear Prologue(3/3/2 Waves of Archer Monks) to get a temporary copy of Nagao Kagetora.
- Clear Section 1-1(Single Room – Avenger Nobu(32,395 HP) + 4 x Saber Ashigaru).
- Clear Section 1-2(Single Room – Berserker Mori Nagayoshi(34,520 HP) + 4 x Caster Monks).
- Avenger Nobu and Mori Nagayoshi will be available as special NPC Support for the event.
- Clear the available Kasugayama Castle(Beginner – Advanced) Free Quests. You will need to farm these quests when you need supply for the Territory Conquests. When you run short on supply go back to Kasugayama Castle Free Quest to get enough for the next territory location. Rinse and repeat.
- Clear Territory Conquests in the following order: Minowa > Kawanakajima > Oshi Castle, Toyama Castle > Fukashi Castle. These locations can be cleared easily without rely on special NPC supports.
- Clear Tozawa Gold Mine (287,318 HP Centaur Knight(Caster)) – Newer Players can wait until they can unlock Medusa NPC Support and come back to this quest later.
- Clear the special recruitment quest at Fukashi Castle to recruit Emiya as an NPC Servant.
- Clear Territory Quests in the following order: Karasuyama > Oyamagobou Castle(Main Quest) > Imperial Capital(Main Quest) > Tsutsujigasaki Castle(Main Quest). * Kanazawa Castle, Tsutsujigasaki Castle and Imperial Capital Free Quests will be available after conquering the territories – Farm these nodes for supplies as soon as they are unlocked.
- The following NPC Supports will made be available: Hijikata(Oyamagobou), Okita(Kasugayama Castle), Oda Kipposhi Nobu(Kasugayama Castle), Li Shuwen(Kasugayama Castle)
- Clear the special recruitment quest at Oyamagobou to recruit Cu Chulainn as an NPC Servant.
- Clear Mumaya Gold Mine(3 x Silver Mecha Nobbu(Berserker). Enemies are invulnerable to damage and have 500% increased attack for 7 turn. Use NPC Cu Chulainn to grant your team with 5 hit Evasion and 5 Time Guts. Wait out the enemy until their buffs wear out and finish them.
- Clear the Border Village Cutscene.
- Clear Section 2 Main Story Quest. You will fight Shibata Katsuie(Berserker) twice. The first battle you only need to beat him or survive for 5 turns. The second battle you deplete both his break bars and you win.
- Clear Appointment Quest for Medusa(Karasuyama).
- Conquer the territories in the following order: Shibata Castle > Nagashino > Nirayama Castle > Gifu Castle(Main Quest) > Sunpu Castle(Main Quest). * Free Quests Sunpu Castle(Best Salt Drops) and Gifu Castle (Best Thread Drops) will be available. Farm these quests once they are unlocked for more supplies.
- Clear Section 2.5 Fortress of the Sun and Outbreak Event(Kasugayama Castle). Fortress of the Sun Free Quest will be available. Clear it once for the rewards and supplies. *ChaCha Support NPC unlocked
- Clear Appointment Quest for Sitonai(Sunpu Castle).
- Capture Hamamatsu and Tsugu Gold Mine.
- Clear Section 2.5 – Defeat Shibata(Kasugayama Castle).
- Clear Appointment Quest for Medea(Fortress of the Sun).
- Clear Sado Gold Mine using Medea NPC Support. Use an AOE NP Servant to wipe out the enemies in one before they regenerate their HP to full the next turn.
- Capture Obama’s Territory(sorry Mr. President…) using NPC Medea to mitigate the boss’ effects. This boss can only really be defeated by NP’s so get yourself a strong ST damage dealer against the Assassin Class Ghost.
- Clear Section 3-1: Okada Izo + 2 Demon King Warrior(Saber).
- Clear Section 3-2: Demon King Nobunaga(Avenger) – 111,384 HP / 151,164 HP. Demon King will constantly apply burn to your entire team. First is the initial 300 Damage Burn for 10 turns. Second is the 200 Damage Burn for 10 turns that is applied to the target that Demon King attacks. Breaking the 1st bar will increase Demon King’s Critical Damage and Chance. She will buff herself with Attack up(increases every turn), Burning Battlefield buff, Self Burn 1000 Damage for 3 turns.
- Demon King Castle Free Quest will be available, this is the best location for farming Miso. Clear it and farm it for supply and Miso Currency.
- Complete the final appointment quest for Cursed Arm Hassan(Oshi Castle).
- Clear Section 4-1: 3/3/2 Waves for Caster Warrior Monks.
- Clear Section 4-2: 3 Black Giants(Archer).
- Clear Section 4-3: Maxwell’s Demon(Archer) – 89,477 / 96,834 / 117,314 HP. Has a skill that can remove one servant’s buffs. Will regenerate 20,000 HP every turn. Breaking the 1st bar will full charge NP to MAX. Breaking the 2nd Bar will have a 70% chance to evade for 3 turns.
- Clear Section 4-4: Maxwell’s Demon(Archer) – 92,791 / 100,420 / 121,659 HP. Same abilities as the previous battle.
- Watch Section 4-5 and Epilogue to make Kagetora Permanent and unlock Demon King Nobunaga NPC Support.
- Final Free Quest – MAXism Honnoji unlocked. This node drops all currencies in even amounts. Worth considering if you lack Gacha CE’s to boost your drops.
- Watch Part II Prologue.
- Capture Part II Section 1 Territory: Kurokawa Castle. Summer Jeanne(Archer), Jalter Santa Lily (Lancer), and Summer Jalter(Berserker). Summer Jalter has two bars and breaking her first bar will grant her with Sure-Hit and charge her NP to the MAX.
- Capture Part II Section 1 Territory: Odawara Castle. Artoria Alter(Lancer), Gawain(Saber), Lancelot(Saber), Bedivere(Saber), Tristan(Archer), and Mordred(Saber). Artoria Alter will have two bars and breaking her first bar will charge her NP to the MAX and grant her Attack Up.
- Capture Part II Section 1 Territory: Kamakura. Nagayoshi(Berserk) and Ushiwakamaru (Rider) – 2 Bars. Breaking bar grants team with full NP gauge and crit rate up.
- Capture Part II Section 1 Territory: Osaka Roman Empire. 9 Roman Soldiers(Saber) and Nero(Saber) – 2 Bars. Killing a soldier will increase Nero’s Attack. Breaking her bar will grant her with 1 time Guts and Debuff Immunity.
- Capture Part II Section 1 Territory: Nanao Castle. Cu Alter(Berseker) – 2 Bars. Breaking first bar grants him with 5 times Guts (10,000 HP).
- Capture Part II Section 1 Territory: Saika Castle. Emiya Alter(Archer) – 2 Bars. Breaking bar will charge his NP for 1 tick every turn for 5 turns.
- Capture Part II Section 1 Territory: Kai Beast Park. Atalanta Alter(Berserker) – 2 Bars and 6 different beast enemies. Breaking her 1st bar gives her Evade for 1 turn and 3 turn Critical Rate Up.
Section 2-1 Boss: Okita Alter(Alter Ego)
- 3 HP Bars: 136,820 HP / 165,487 HP / 191,548 HP
- 1st Bar Break: Permanent Crit Rate Up.
- 2nd Bar Break: Permanent Crit Damage Up.
Section 2-2 Final Boss: Black Giant(Archer).
- 3 HP Bars: 131,019 HP HP / 152,309 HP / 204,717 HP
- Heals 50,000 HP Every Turn.
- 1st Bar Break: Debuff frontline servants with 1 time defense buff nullification.
- 1st Bar Break: Debuff frontline servants with Attack Down for 3 turns.
- 2nd Bar Break: Debuff frontline servants with 1 time offense buff nullification.
- 2nd Bar Break: Debuff frontline servants with NP Damage Down for 3 turns.
- Farm Free Quest for Currency and Supply. (Check Infograph for the best locations)
- Capture Nikko.
- Chichibu Mine.
- Capture Koka Ninja Village.
- Capture Takayama Castle.
- Capture Ryugu-jo.
Final Oni Shibata (Berserker) – 700,632 HP / 1,003,510 HP / 1,507,090 HP
- “Kakare… ADVANCE!!!”: At the start of every turn, will increase own defense by 10% for 2 turns and recover 2000 HP if not afflicted with Immobility Debuffs (Stun, Sleep, Pig, Charm, Arts/Quick/Buster Block)
- After the 1st bar breaks the boss will: block 30,000 damage for 6 attacks and “Kakare… ADVANCE!!!” will be amplified with the following effects: Increases own defense by 15% for 2 turns, reduces own damage taken by 1500 for 2 turns, and recovers own HP by 2500.
- After 2nd bar breaks the boss will: block 30,000 damage for 6 attacks and “Kakare… ADVANCE!!!” will be amplified with the following effects: Increases own defense by 20% for 2 turns, reduces own damage taken by 2000 for 2 turns, and recovers own HP by 3000.
- Can grant self with Mental Debuff Immunity and increase NP charge by 1 tick after reaching 3/5 NP Bar.
- Can recover HP by 200,000. Can only use during Turn: 9, 10, 11, 17, 19, and 21.
- Grants self with 1 turn delayed buff that grants 100% Critical Change for 1 turn.
- Traits: Humanoid, Male, Servant, Weak to Enuma Elish.
- Attribute: Man
- Battlefield type: Sunlight Field.
- Stack as much damage bonus as possible using Event Servant Bonus (Nagao Kagetora is recommended here) and Event CE Bonus.
- Euryale is very handy here as she can charm lock the boss and inflict massive anti-male damage.
- Be aware that once the boss reaches 3/5 NP gauge, he can grant himself with immunity to charms, stuns, pig, sleep, etc. and can charge up his NP.
- Starting at turn 9, he will start using his healing skill for 200,000 HP. Kill him by then.
Event Free Quest Drop Rates
- Work in Progress


