![]() Call us now:
Call us now:


Event Ends In
Navigation: Event Guidelines > Support Setup > Infograph > Walkthrough > Event Drops
Event Guidelines
This is a guide for the Fate/Grand Order – Fate/Apocypha Rerun Event.
Apocrypha Revival Event consists primarily of Raid Battles, Welfare Servant, and finally a Point Reward Banner.
Your goal for this event is play through the event by grinding Raid Battles and gathering coins for the reward banner. 4* Caster – Sieg is one of the best farming/looping Arts AOE Caster in the game currently in the game, this will be your final opportunity to get him for free. Don’t miss out!
Guidelines to follow
NOTE: Farming Raids are very fast and efficient. The Earlier Raids will be a single boss with a single health bar. The Final Raids will have a boss with a random Apocrypha servant with it. There are no rewards for clearing lower difficulties. Go for the highest difficulty from the start.
Support Setup Recommendation
Players will mostly focus on maximizing Dracul Coins from the Raids, therefore Support Casters with “Afternoon at the Fortress” 5* CE are preferred. 5* Kintoki Berserker with “At Trifas” 5* CE, is the main pick for players who lack single target damage dealers. Gacha CE’s are typically secondary after the Raids are over. By the time the Raids are done, you probably won’t need to farm free quest much for the Event Shop. NOTE: Mona or Bella Lisa CE are also good options to put on your support servants as the Raids drop a substantial amount of QP

Apocrypha Revival Infograph
By Kevinrealk
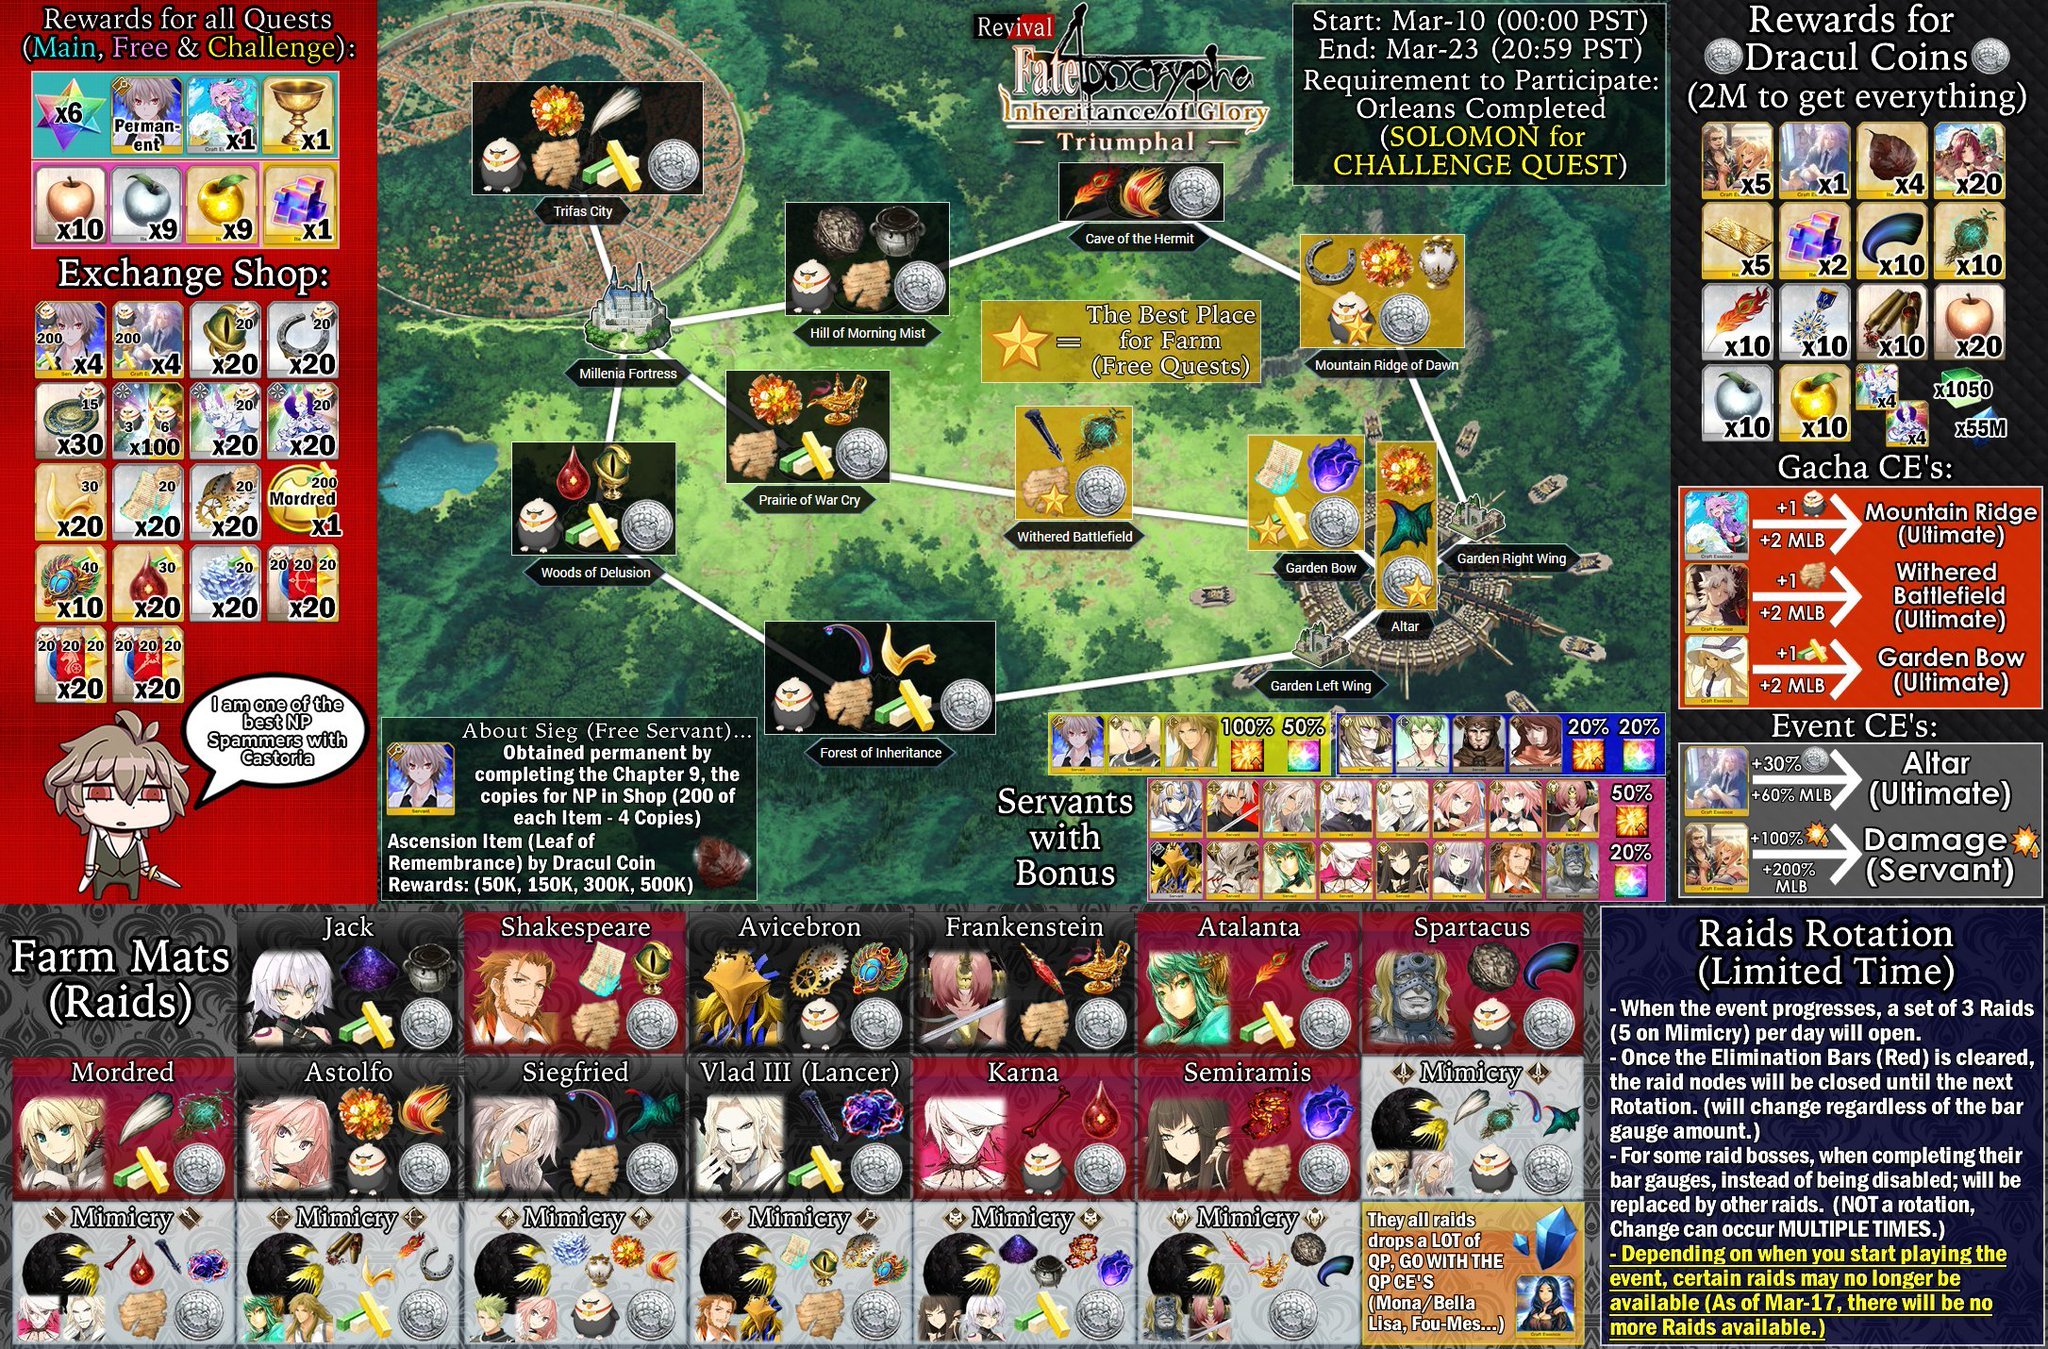
Click image for full sized version
Event Walkthrough
Getting Started
Click each part below for detailed walkthrough
- Start the event and watch/skip the prologue.
- Clear the Section 1 Main Quest (very easy golem and dragon tooth warrior mobs) and receive the 3* Event Gatcha CE.
- Watch Section 2 Intro to unlock your first set of Raids and receive a temporary copy of Sieg.
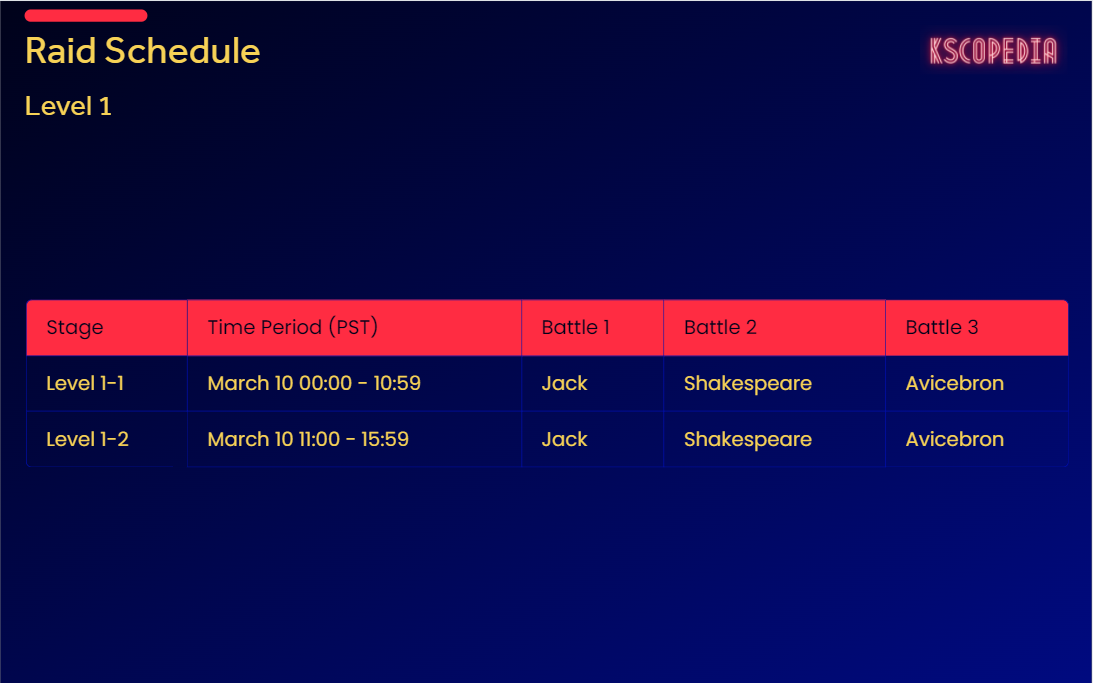
- Jack, Shakespeare, and Avicebron will be your choice for this stage.
- Jack(Black) – Drops Void Dust, Black Beast Grease, and Sage Chalk.
- Shakespeare(Red) – Drops Pages, Serpent Jewel, and Illiad Fragment.
- Avicebron(Black) – Drops Gears, Scarabs, and Hippogriffin Plush.
- Clear Section 2 Final (Jack, Avicebron, and Shakespeare in a single wave all less than 55k HP).
- Watch Section 3 Intro to unlock the next set of Raid Quests
- Frankenstein, Atalante, and Spartacus will be the bosses for this stage.
- Frankenstein(Black) – Drops Cerespinal Fluid, Lamps, and Illiad Fragments.
- Atalanta(Red) – Drops Feathers, Horseshoes, and Sage Chalk.
- Spartacus(Red) – Drop Seeds, Chaos Talons, and Hippogriffin Plush.
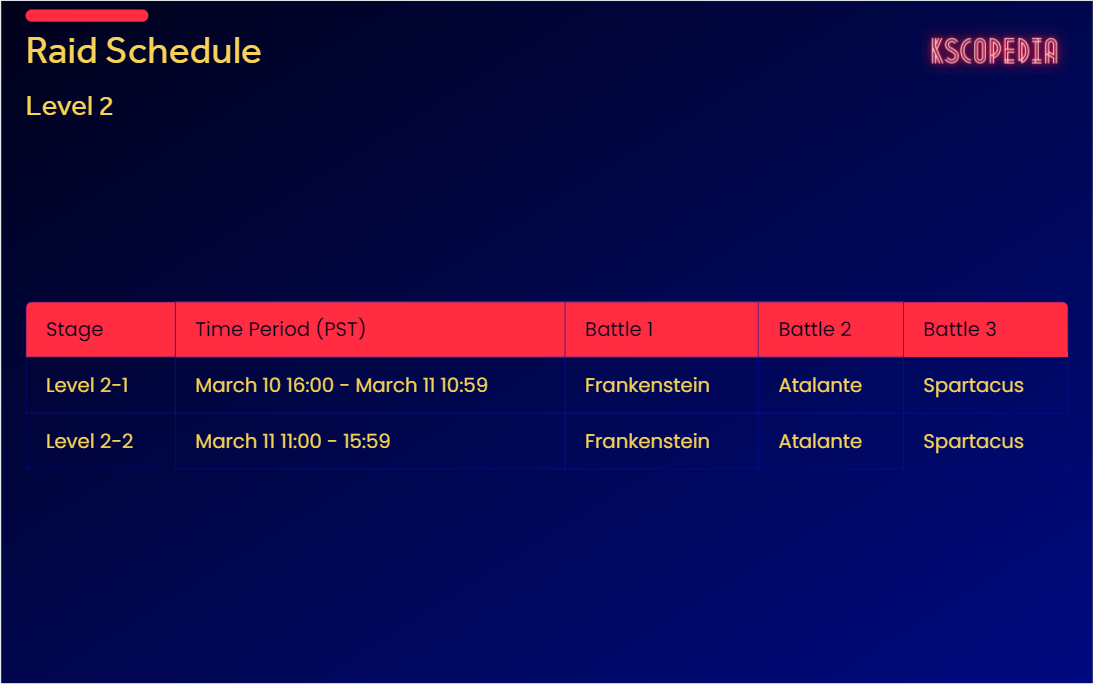
- Clear Section 3 Final (Similar to Section 2 Final, this time with Atalante, Frankenstein, and Spartacus as enemies.)
- Watch Section 4 Intro to unlock next set of raids.
- This set of raids will have a rotating system where the bosses with switch once the numbers of battles within the category gets depleted.
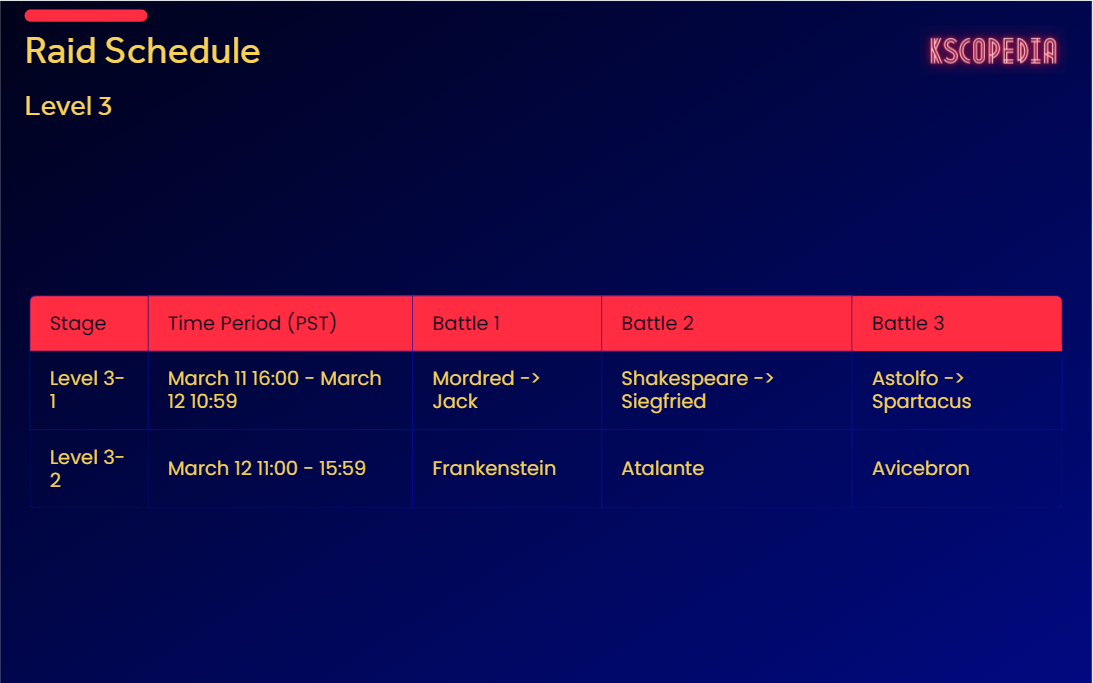
3 Different Rotation categories for part 1:
- Mordred then Jack.
- Shakespeare followed by Siegfried.
- Astolfo followed by Spartacus.
Part 2 will have Frankenstein, Atalante, and Avicebron. There are no rotations here.
- Mordred(Red) drops Dragon Fang, Spirit Root, and Sage Chalk.
- Siegfried(Black) drops Poison Needles, Reverse Dragon Scale, and Illiad Fragment.
- Astolfo(Black) drops Octuplet Crystals, Primordial Lanugo, and Hippogriffin Plush.
- The rest of the bosses drop the same materials as the previous stages.
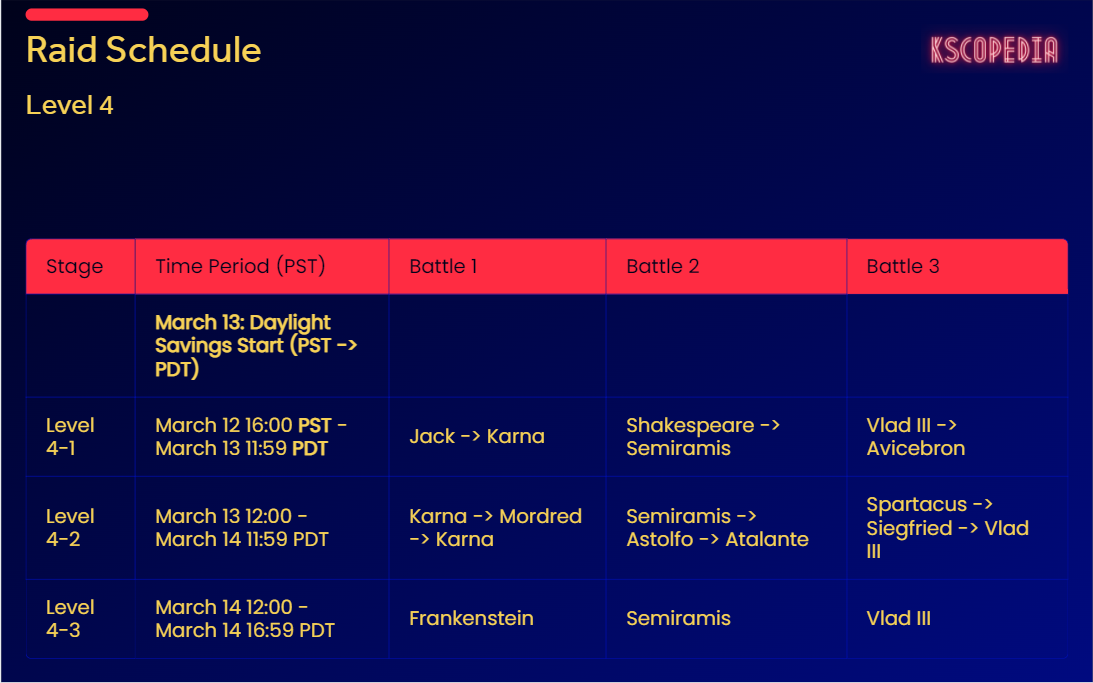
- NOTE: Daylight savings time causes the server time to move forward one hour on March 13. Time zone will be changed from Pacific Standard Time (PST) to Pacific Daylight Savings Time (PDT).
- Clear Section 4 Final(Mordred, Siegfried, and Astolfo)
- Clear Chapter 5(3 x 3 Waves of Enemy Golems on all parts).
- Watch Chapter 6 Intro to unlock Raid Level 4
- There will be multiple rotations on this stage (check the Raid Schedule table below for details).
- All the remaining Apocrypha servants will be in this battle: Karna, Semiramis, Vlad III.
First set will rotate once, the second set will rotate twice, and the final set will be fixed.
- Karna(Red) drops Bones, Blood Tearstone, and Hippogriffin Plush.
- Vlad III(Black) drops Stakes, Gallstone, and Sage Chalk.
- Semiramis(Red) drops Chains, Hearts, and Illiad Fragments.
- The rest of the servant drop remain unchanged from their previous iterations.
- Clear Section 6 Final(Semiramis, Vlad III, and Karna).
- Watch Chapter 7 Cutscene to unlock the final set of Raid Quests.
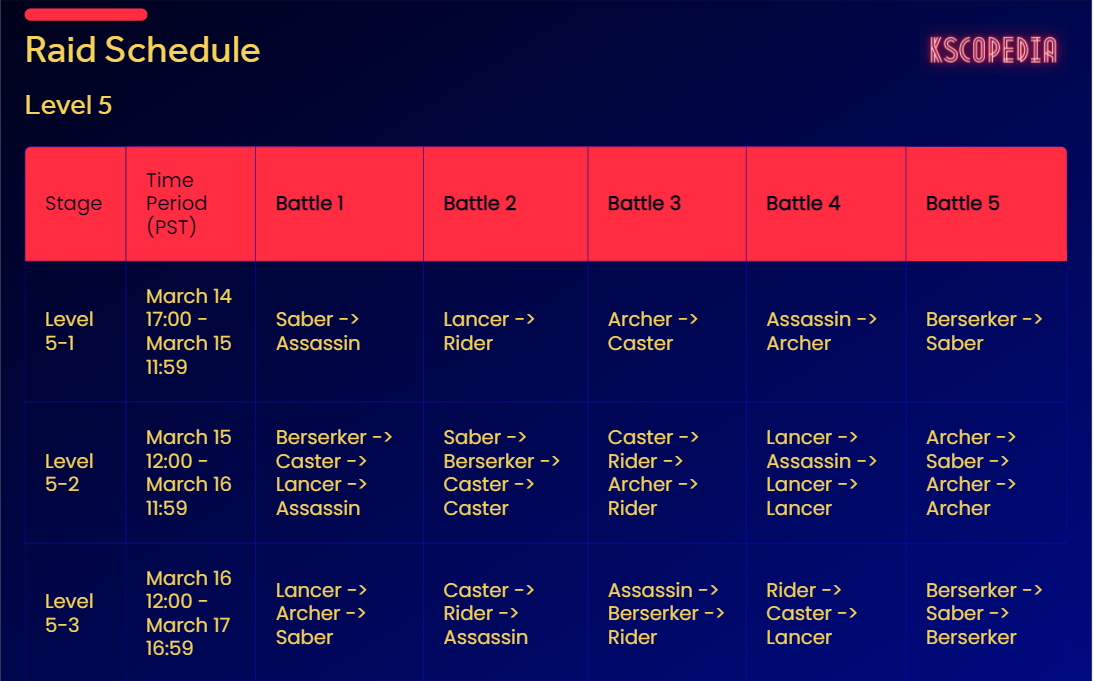
Raid Quests in this stage have numerous rotations and work very differently from the previous stages.
The primary boss is Heaven’s Feel Mimicry that summons a random apocrypha servant(either of Red or Black Faction of the same class) onto the field.
- Use an AOE Servant this time to wipe out both the Mimicry and the summoned servant for maximum rewards.
- HP scaling is lower 400,000 compared to 680,000 for the previous stages.
- The rewards you receive will be reliant on which enemy servant gets summoned alongside the Mimicry.
- Clear Section 8(Ruler Class Mimicry with Chiron and Achilles).
- The battle is fairly easy as you can easily wipe out Chiron and Achilles in a single turn.
- The lone Mimicry is not much of a three with its three health bars.
- Watch the Section 9 Cutscene to complete the event story.
- Receive a Holy Grail(Crystalized Lore for prior completion) and making Sieg permanent.
- Clear all the available Free Quest at least once to get the first-time clear rewards.
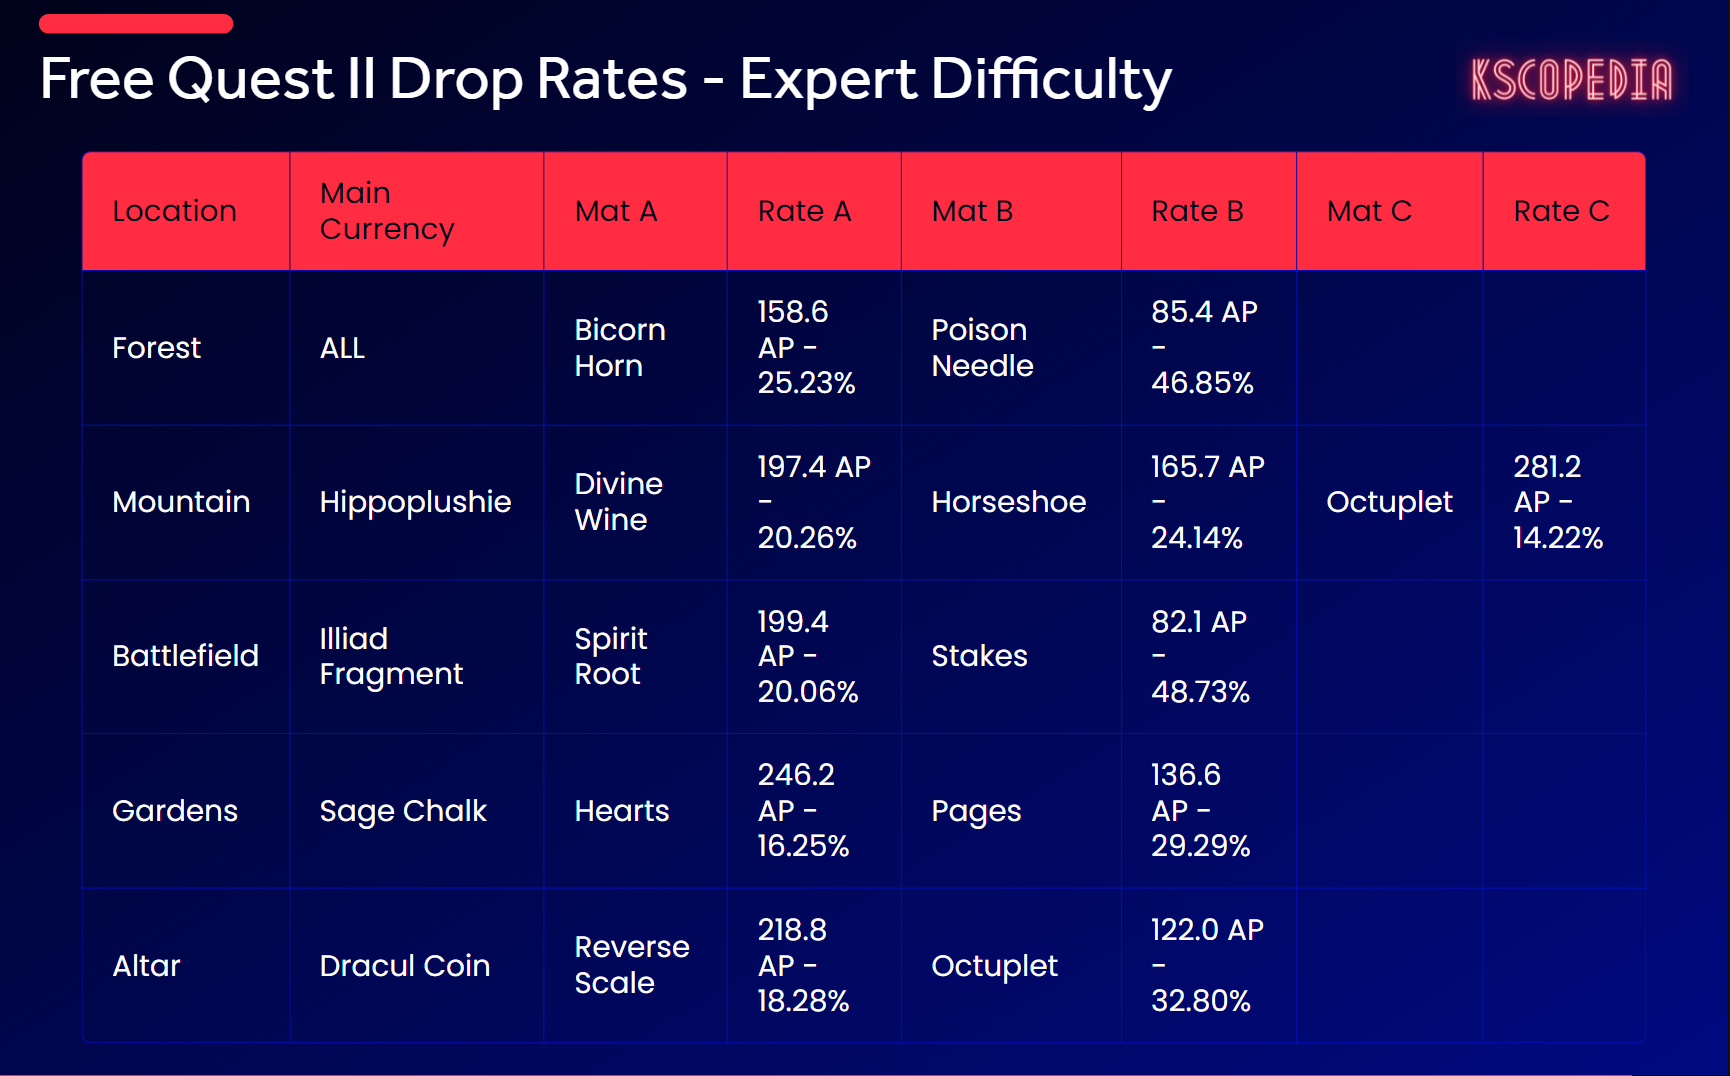
- Farm the locations under the Free Quest II Table under the Drops section for any of the remaining currencies you need.
- Make sure to purchase all copies of Sieg from the shop. If you already had a completed Sieg from the previous event, you shall receive rare prisms for each additional copy you get in this event.
- Make sure you get the Spiriton Dress Wardrobe Key for Mordred before the Event is over. It’s a limited time costume that goes very nicely with your Mordred (if you have one that is).
- Once you have cleared the Event Shop and the Point rewards banner, it is time to beat the Challenge Quest.
Challenge Quest
Fatal Battle 1/1
Amakusa Shirou(270,854 / 303,300 HP) with Benkei (174,176 HP) and David (150,742 HP) on field. Berserker Kintoki (201,942 HP) and Georgios (251,781 HP) will appear as reinforcements when an enemy is defeated on the field.
- Amakusa Shirou does not have an offensive NP, but instead will buff his allies (except himself) with Attack and Defense UP for 3 turns.
- Breaking Amakusa’s 1st bar will apply an On-Death buff on himself, which will grant all his allies with a Permanent Critical Rate and Defense UP that is unremovable.
- The battle is rather simple: Bring out your best Avenger/Berserker AOE NP Servant equipped with an MLB “At Trifas” CE for the 200% Damage bonus.
- Do your best to be able to break Amakusa’s HP Bar and kill his allies at the same time with your NP.
- Avoid killing Amakusa first as it will make his allies harder to kill. Keep him alive until you can either wipe him and his remaining allies out at the same time or leave him for last.
Drop Rates
- Servants of Black drop “An Afternoon at the Fortress” CE while Servants of Red drop “At Trifas” CE.
- Ascension Material drop rates are fairly good for Raid battles and is worth using your apples for.
- While individually each item drop rate is inferior to farming singularity free quests, the fact that you get multiple different materials at the same time on top of it being party of your event progression makes it a good bargain for the AP.
- Raids are superior to the Free Quests due to much better ascension material drop rates. You can farm for materials while getting shop currency and Dracul Coins. Raids can be cleared in a single turn compared to 3 turns for Free Quests.
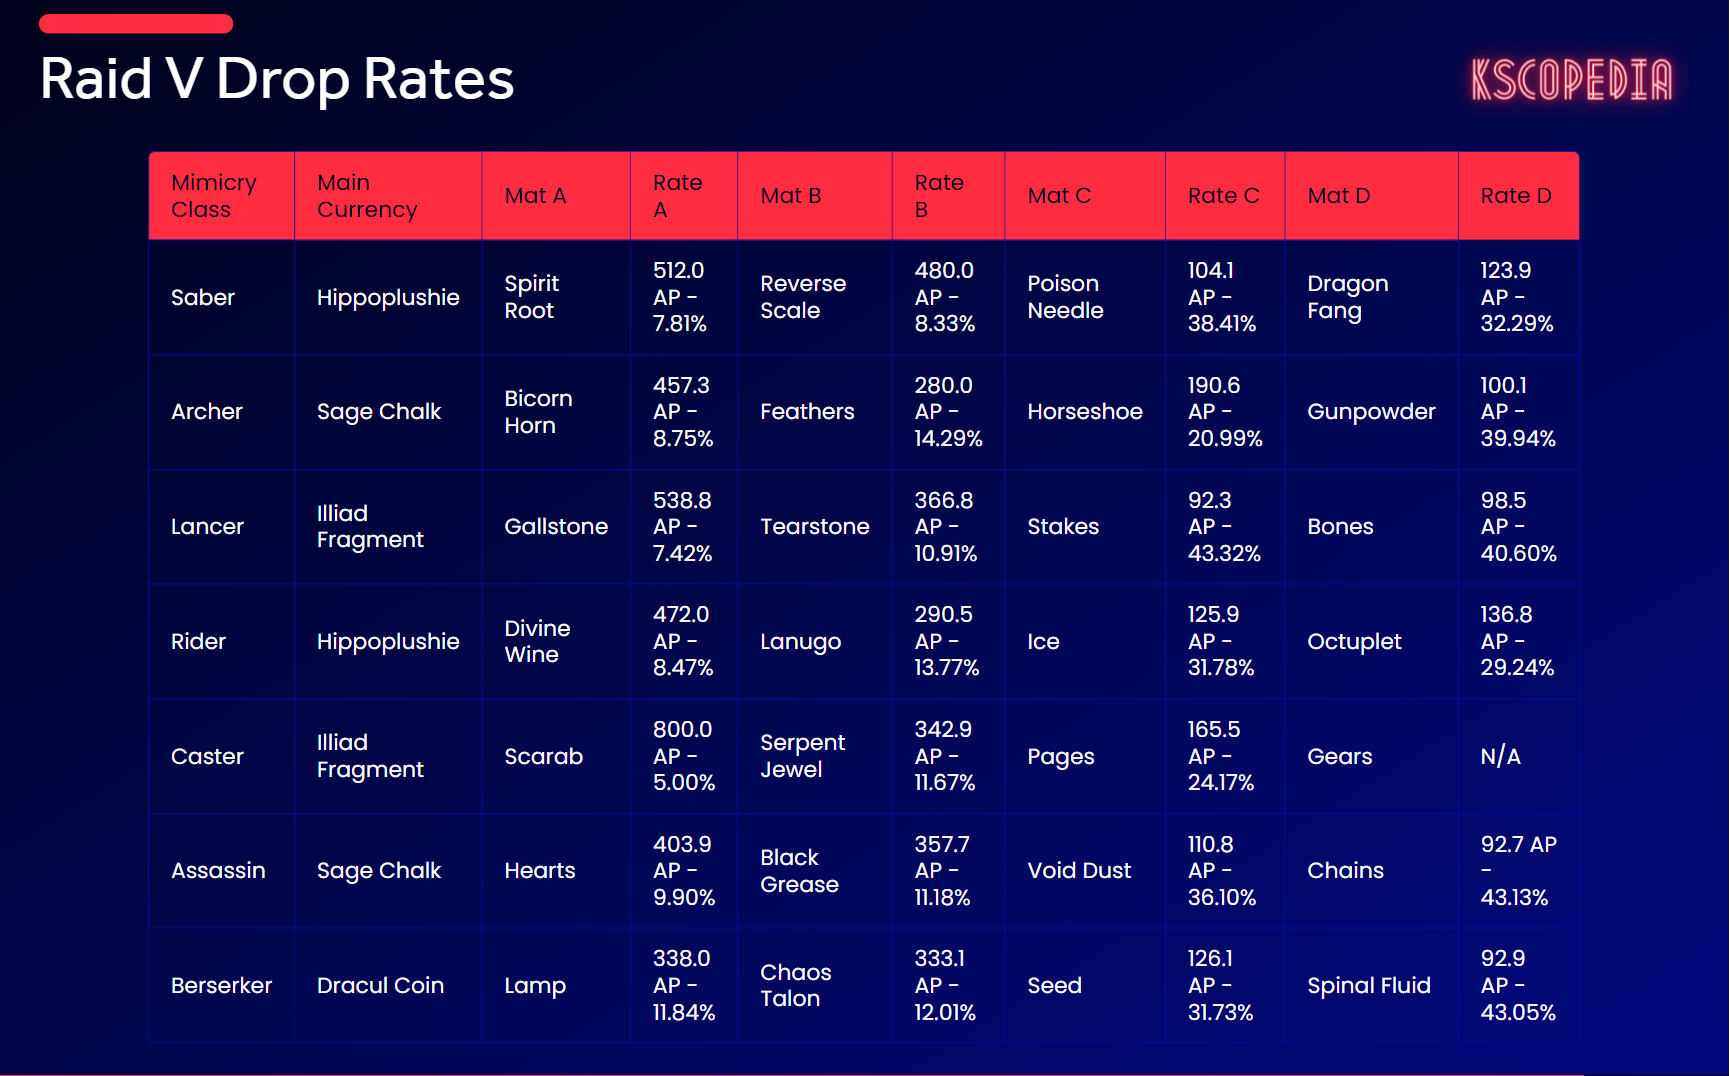
- Raid I-IV have much better drops for individual materials while Raid V has half the rates due to the 50/50 Chance of which servant shows up.
- Farm the quest under Free Quest II Table for the best amount of currency drops.
Click on the images below to see the full size.